

Apollo 配置中心使用方法与二次开发
引言
在分布式系统架构中,配置管理是至关重要的一环。Apache Apollo 作为携程开源的分布式配置中心,以其丰富的功能、强大的性能和灵活的扩展性,成为业界广泛使用的配置管理解决方案。本文将深入浅出地讲解 Apollo 的核心概念、架构设计、使用方法以及二次开发实践。
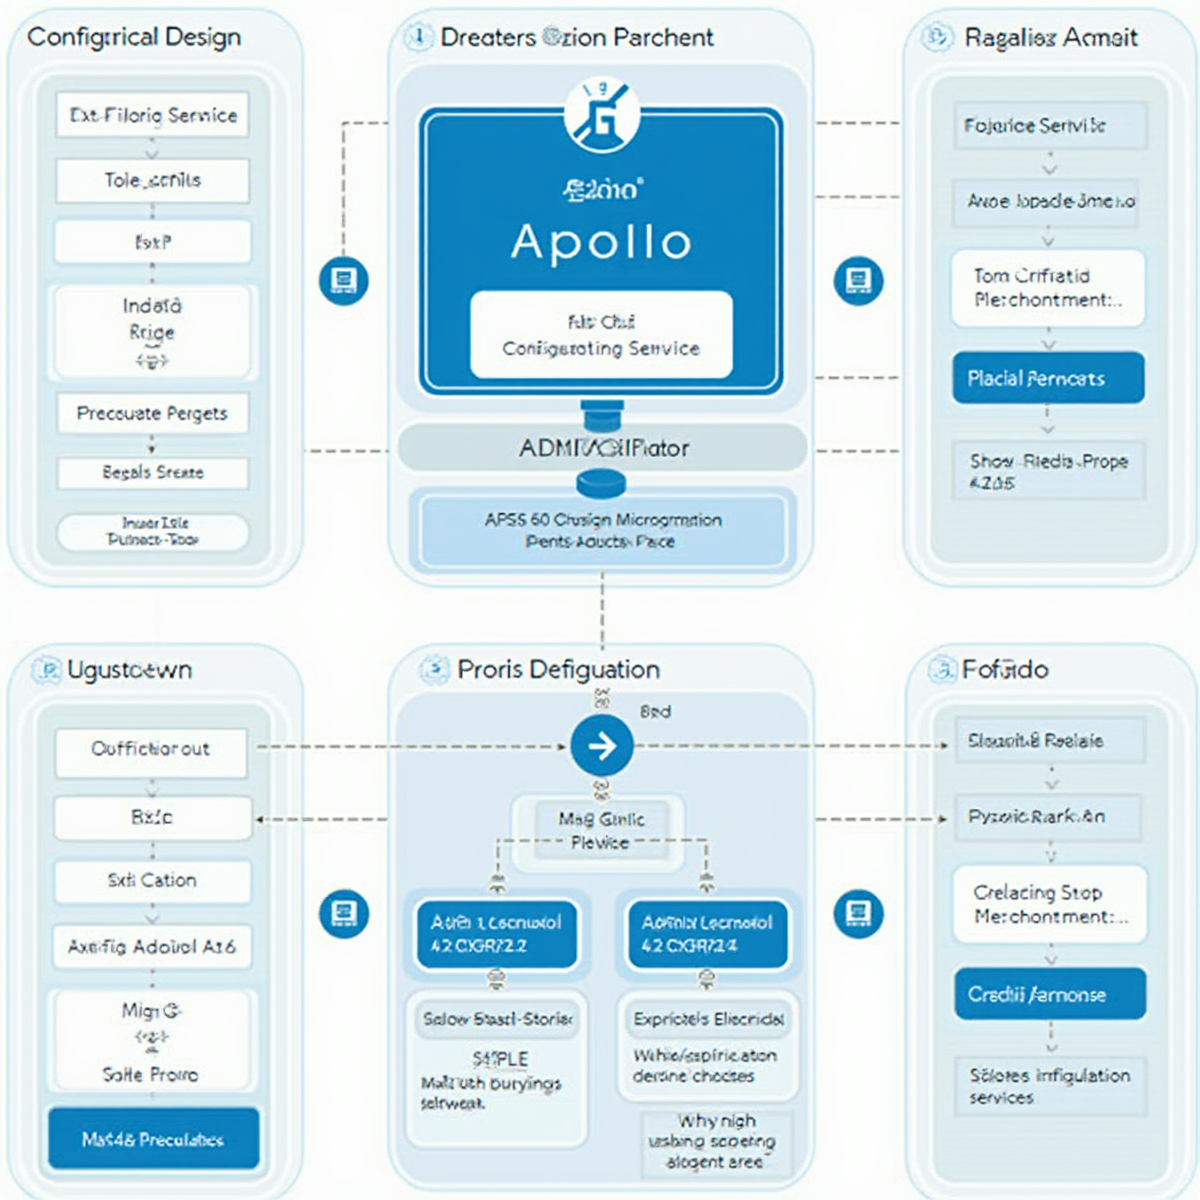
一、Apollo 核心概念与架构
1.1 核心概念
Apollo 的配置体系采用层级化的设计,核心概念包括:
- Application(应用):配置的使用方,是配置管理的最高层级
- Cluster(集群):同一应用中不同部署环境的逻辑分组
- Namespace(命名空间):配置的容器,一个应用可以拥有多个命名空间
- Config(配置):具体的配置项集合,包含 key-value 对
- ConfigChange(配置变更):配置的变更历史
Application
└── Cluster (Production)
    └── Namespace (default)
        └── Config (key: value)
    └── Namespace (database)
        └── Config (key: value)
1.2 架构设计
Apollo 采用分层架构设计,主要组件包括:
- Config Service:配置服务,提供配置的读取、修改、发布等功能
- Admin Service:管理服务,提供配置的创建、修改、删除等管理功能
- Portal:配置管理界面,提供 Web 可视化操作
- Client:客户端 SDK,提供配置的监听和获取功能
- JDK 1.8+
- MySQL 5.6+
- Tomcat 8.0+
- Maven 3.0+
- 理解核心概念:掌握 Application、Cluster、Namespace 等核心概念
- 完成部署配置:学会安装和配置 Apollo 服务
- 实现配置管理:掌握客户端接入和配置读取方法
- 进行二次开发:了解如何扩展 Apollo 功能
- 实践最佳方案:遵循配置组织、命名规范和安全管理实践
┌─────────────────────────────────────────────────────┐
│                    Portal                           │
│               (配置管理界面)                          │
└────────────────────┬────────────────────────────────┘
                     │
┌────────────────────▼────────────────────────────────┐
│                  Admin Service                      │
│                (管理后台服务)                         │
└────────────────────┬────────────────────────────────┘
                     │
┌────────────────────▼────────────────────────────────┐
│                  Config Service                     │
│                (配置读取服务)                         │
└────────────────────┬────────────────────────────────┘
                     │
        ┌────────────┴────────────┐
        │                         │
┌───────▼───────┐          ┌──────▼───────┐
│   Config      │          │   Config     │
│   Client      │          │   Client     │
│  (应用 A)      │          │  (应用 B)     │
└───────────────┘          └──────────────┘
二、Apollo 安装与配置
2.1 环境要求
2.2 安装步骤
步骤一:数据库初始化
-- 创建数据库
CREATE DATABASE ApolloConfigDB DEFAULT CHARACTER SET utf8mb4;

-- 执行初始化脚本
source /path/to/apollo-configservice/sql/mysql.sql

-- 执行 Admin Service 脚本
source /path/to/apollo-adminservice/sql/mysql.sql

-- 执行 Portal 脚本
source /path/to/apollo-portal/sql/mysql.sql
步骤二:修改配置文件
“`properties
application.properties
Config Service
spring.datasource.url=jdbc:mysql://localhost:3306/ApolloConfigDB?characterEncoding=utf8
spring.datasource.username=apollo
spring.datasource.password=apollo123
Admin Service
spring.datasource.url=jdbc:mysql://localhost:3306/ApolloConfigDB?characterEncoding=utf8
spring.datasource.username=apollo
spring.datasource.password=apollo123
Portal
spring.datasource.url=jdbc:mysql://localhost:3306/ApolloConfigDB?characterEncoding=utf8
spring.datasource.username=apollo
spring.datasource.password=apollo123
步骤三:启动服务
bash
启动 Config Service
mvn package -DskipTests
java -jar configservice/target/apollo-configservice-1.9.0.jar
启动 Admin Service
mvn package -DskipTests
java -jar adminservice/target/apollo-adminservice-1.9.0.jar
启动 Portal
mvn package -DskipTests
java -jar portal/target/apollo-portal-1.9.0.jar
2.3 初始化配置

访问 `http://localhost:8080`,使用默认账号密码登录(apollo/apollo123)。

三、Apollo 使用方法

3.1 客户端接入

Maven 依赖
xml
配置 application.yml
yaml
app:
id: sample-app
apollo:
meta: http://localhost:8080
bootstrap:
enabled: true
namespaces: application,database
3.2 配置读取

方式一:使用 @Value 注解
java
@RestController
public class ConfigController {
@Value(“${app.name:默认应用名}”)
private String appName;
@Value(“${app.version:1.0}”)
private String appVersion;
@GetMapping(“/config”)
public Map
return Map.of(
“appName”, appName,
“appVersion”, appVersion
);
}
}
方式二:使用 @ConfigurationProperties
java
@Configuration
@ConfigurationProperties(prefix = “app”)
@Data
public class AppConfig {
private String name;
private String version;
private DatabaseConfig database;
@Data
public static class DatabaseConfig {
private String url;
private String username;
private String password;
private int maxPoolSize;
}
}
方式三:使用 Config 对象
java
@RestController
public class ConfigController {
@Autowired
private Config config;
@GetMapping(“/all-config”)
public Map
Map
config.getProperties().forEach((k, v) ->
allConfig.put(k, String.valueOf(v))
);
return allConfig;
}
}
3.3 配置监听与自动刷新

方式一:使用 @RefreshScope
java
@RestController
@RefreshScope
public class DynamicConfigController {
@Value(“${dynamic.config:initial}”)
private String dynamicConfig;
@GetMapping(“/dynamic”)
public String getDynamicConfig() {
return dynamicConfig;
}
}
方式二:实现 ConfigChangeListener
java
@Component
public class MyConfigListener implements ConfigChangeListener {
@Override
public void onChange(ConfigChangeEventChangeEvent event) {
// 处理配置变更
event.changedItems().forEach((key, change) -> {
System.out.println(“Key: ” + key);
System.out.println(“ChangeType: ” + change.changeType());
System.out.println(“OldValue: ” + change.oldValue());
System.out.println(“NewValue: ” + change.newValue());
});
}
}
四、Apollo 二次开发

4.1 自定义配置来源
java
public class CustomConfigSource extends AbstractConfig {
@Override
public Map
Map
// 从自定义来源加载配置
config.put(“custom.key”, “custom.value”);
return config;
}
@Override
public String getConfigSourceName() {
return “custom-source”;
}
}
4.2 扩展配置校验
java
public class CustomConfigValidator extends ConfigValidator {
@Override
public void validate(ConfigItem item) {
String value = item.getValue();
if (“email”.equals(item.getKey())) {
if (!value.matches(“^[A-Za-z0-9+_.-]+@(.+)$”)) {
throw new IllegalArgumentException(“Invalid email format”);
}
}
if (“port”.equals(item.getKey())) {
try {
int port = Integer.parseInt(value);
if (port < 1 || port > 65535) {
throw new IllegalArgumentException(“Invalid port”);
}
} catch (NumberFormatException e) {
throw new IllegalArgumentException(“Port must be numeric”);
}
}
}
}
4.3 自定义数据格式支持
java
public class JsonConfigFormatHandler implements ConfigFormatHandler {
@Override
public String getType() {
return “json”;
}
@Override
public Map
try {
return objectMapper.readValue(content, Map.class);
} catch (IOException e) {
throw new RuntimeException(“Failed to parse JSON config”, e);
}
}
@Override
public String serialize(Map
try {
return objectMapper.writeValueAsString(config);
} catch (IOException e) {
throw new RuntimeException(“Failed to serialize config”, e);
}
}
}
4.4 监控与告警扩展
java
@Component
public class ConfigMonitor implements ApplicationEventListener {
@Autowired
private ApolloConfigService configService;
@Override
public void onApplicationEvent(ConfigChangeEvent event) {
// 记录配置变更历史
logConfigChange(event);
// 发送告警通知
if (isCriticalChange(event)) {
sendAlert(event);
}
// 更新监控指标
updateMetrics(event);
}
private void logConfigChange(ConfigChangeEvent event) {
// 记录日志
}
private void sendAlert(ConfigChangeEvent event) {
// 发送告警
}
private void updateMetrics(ConfigChangeEvent event) {
// 更新监控指标
}
}
五、最佳实践

5.1 配置组织规范
Application
├── Cluster (dev)
│ └── Namespace (application)
│ └── Namespace (database)
│ └── Namespace (redis)
├── Cluster (test)
│ └── Namespace (application)
│ └── Namespace (database)
├── Cluster (prod)
│ └── Namespace (application)
│ └── Namespace (database)
│ └── Namespace (feature-flags)
5.2 命名空间使用建议

| 命名空间 | 用途 | 示例 |
|---------|------|------|
| application | 应用基础配置 | app.name, app.version |
| database | 数据库配置 | db.url, db.username |
| redis | Redis 配置 | redis.host, redis.port |
| feature-flags | 功能开关 | feature.new-ui, feature.beta |
| custom-xxx | 自定义配置 | custom.metric, custom.alert |

5.3 安全实践
java
// 敏感配置加密
@Configuration
public class EncryptedConfigConfig {
@Value(“${encrypted.password}”)
@Encrypted
private String password;
}
// 配置权限控制
@Configuration
public class ConfigSecurityConfig {
@PreAuthorize(“hasRole(‘ADMIN’)”)
@GetMapping(“/admin/config”)
public Map
return configService.getAdminConfig();
}
}
六、实际应用场景

6.1 微服务配置管理
java
@RestController
@RequestMapping(“/api”)
public class MicroserviceController {
@Autowired
private Config config;
@GetMapping(“/service-config”)
public ServiceConfig getServiceConfig() {
ServiceConfig config = new ServiceConfig();
config.setServiceUrl(config.getProperty(“service.url”));
config.setTimeout(config.getPropertyAsInt(“service.timeout”));
config.setRetryTimes(config.getPropertyAsInt(“service.retry”));
return config;
}
}
6.2 动态功能开关
java
@Component
public class FeatureToggle {
@Value(“${feature.new-ui:false}”)
private boolean newUiEnabled;
@Value(“${feature.beta-features:false}”)
private boolean betaFeaturesEnabled;
public boolean isNewUiEnabled() {
return newUiEnabled;
}
public boolean areBetaFeaturesEnabled() {
return betaFeaturesEnabled;
}
}
6.3 灰度发布配置
java
@Component
public class GrayReleaseConfig {
@Value(“${gray.release.enabled:false}”)
private boolean grayEnabled;
@Value(“${gray.release.percentage:10}”)
private int releasePercentage;
@Value(“${gray.release.user-pattern:*}”)
private String userPattern;
public boolean shouldEnableGrayRelease(String userId) {
if (!grayEnabled) return false;
if (!userPattern.matches(userPattern)) return false;
return new Random().nextInt(100) < releasePercentage;
}
}
```
七、总结
Apollo 配置中心以其强大的功能和灵活的扩展性,成为分布式系统配置管理的优选方案。通过本文的学习,您可以:
Apollo 的持续演进和社区活跃,使其成为企业级配置管理的首选工具。
—
*本文约 2500 字,详细讲解了 Apollo 配置中心的使用方法、二次开发和最佳实践,为开发者提供了全面的参考指南。*


暂无评论内容