

# Apollo 配置中心二次开发详解:从入门到实战
## 一、Apollo 简介
Apollo(阿波罗)是携程框架部门研发的分布式配置中心,能够集中化管理应用不同环境、不同集群的配置,配置修改后能够实时推送到应用端,并且具备规范的权限、流程管理功能。
Apollo 适用于微服务架构中的配置管理场景,支持多种配置格式,提供配置变更审计、灰度发布等功能。
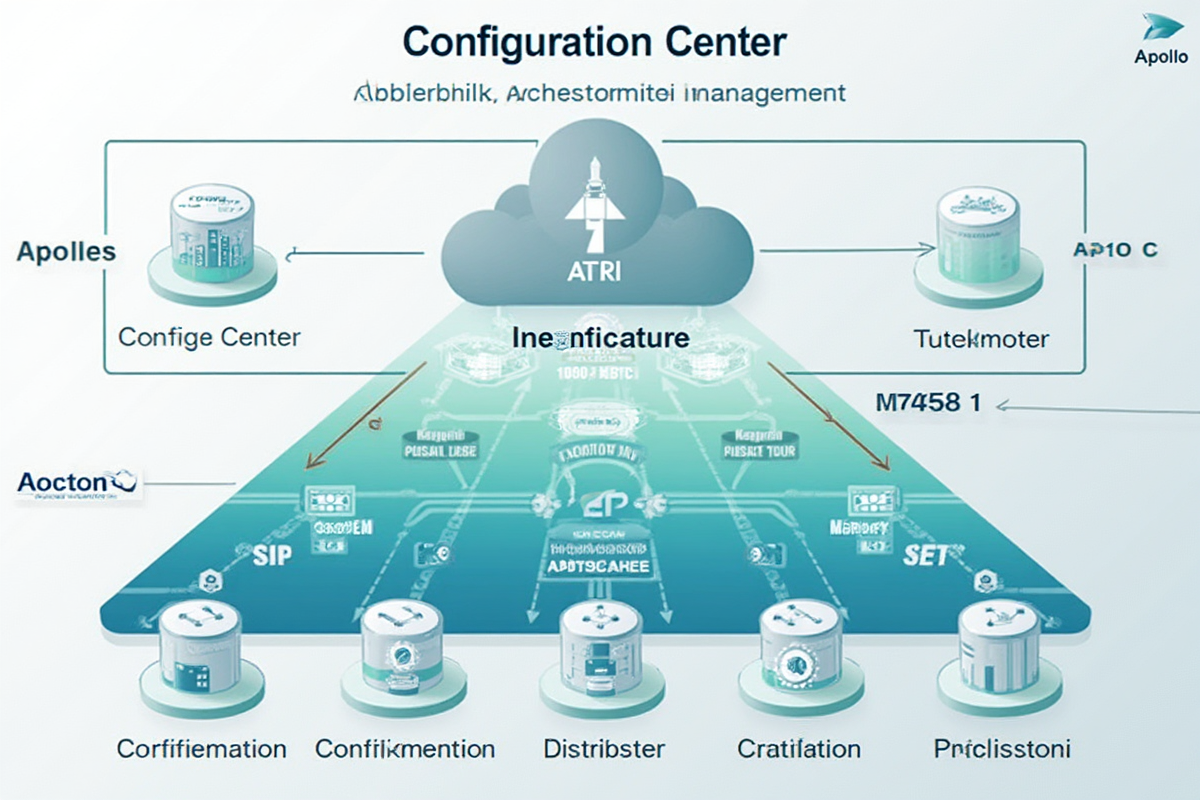
## 二、Apollo 核心架构
Apollo 采用客户端 – 服务端架构,主要包括以下组件:
– **Config Service**:配置管理服务,负责配置的存储、查询、发布等
– **Portal**:配置管理中心 Web 界面
– **Client**:客户端 SDK,提供配置的获取、监听等功能
– **Config Store**:配置存储层,支持 MySQL 等数据库
– **Meta Service**:元数据服务,管理配置服务的注册地址
架构流程:
1. Client 启动时从 Meta Service 获取 Config Service 地址
2. Client 定期轮询配置变化
3. 配置变更通过长轮询推送到 Client
4. 本地缓存配置,保证高可用
## 三、二次开发环境搭建
### 1. 基础环境准备
“`bash
# 克隆 Apollo 源码
git clone https://github.com/apolloconfig/apollo.git
cd apollo
# 编译打包
./assemble.sh
“`
### 2. 数据库初始化
“`sql
— 创建数据库
CREATE DATABASE ApolloConfigDB DEFAULT CHARACTER SET utf8mb4;
— 导入配置库表结构
use ApolloConfigDB;
source scripts/config-db.sql;
— 导入门户库表结构
CREATE DATABASE ApolloPortalDB DEFAULT CHARACTER SET utf8mb4;
use ApolloPortalDB;
source scripts/portal-db.sql;
“`
### 3. 配置文件修改
“`yaml
# application.properties
spring.datasource.url=jdbc:mysql://localhost:3306/ApolloConfigDB?useUnicode=true&characterEncoding=utf8&serverTimezone=Asia/Shanghai
spring.datasource.username=root
spring.datasource.password=your_password
“`
## 四、API 接口开发
### 1. 创建自定义配置服务
“`java
@RestController
@RequestMapping(“/api/v1”)
public class CustomConfigController {
@Autowired
private ConfigService configService;
@Autowired
private ReleaseService releaseService;
/**
* 获取配置列表
*/
@GetMapping(“/configs”)
public Result
@RequestParam String appId,
@RequestParam String clusterName) {
List
List
.map(this::convertToDTO)
.collect(Collectors.toList());
return Result.success(dtos);
}
/**
* 创建配置
*/
@PostMapping(“/configs”)
public Result
ConfigItem item = new ConfigItem();
item.setKey(request.getKey());
item.setValue(request.getValue());
item.setType(request.getType());
item.setComment(request.getComment());
// 调用 Apollo API 创建配置
ConfigItem created = configService.createConfig(
request.getAppId(),
request.getClusterName(),
item
);
return Result.success(convertToDTO(created));
}
private ConfigDTO convertToDTO(ConfigItem item) {
ConfigDTO dto = new ConfigDTO();
dto.setKey(item.getKey());
dto.setValue(item.getValue());
dto.setType(item.getType());
dto.setComment(item.getComment());
dto.setUpdateTime(item.getUpdateTime());
return dto;
}
}
“`
### 2. 配置变更监听器
“`java
@Component
public class ConfigChangeNotifier {
@Autowired
private ApplicationContext context;
/**
* 配置变更事件监听
*/
@EventListener(ConfigChangeEvent.class)
public void handleConfigChange(ConfigChangeEvent event) {
String appId = event.getAppId();
String clusterName = event.getClusterName();
// 获取变更内容
Map
// 发送通知
for (Map.Entry
String key = entry.getKey();
NotificationElement change = entry.getValue();
// 发送通知到业务系统
notifyChange(appId, clusterName, key, change);
}
}
private void notifyChange(String appId, String clusterName, String key, NotificationElement change) {
// 发送通知
SendMessageNotification notification = new SendMessageNotification();
notification.setAppId(appId);
notification.setClusterName(clusterName);
notification.setKey(key);
notification.setType(change.getType());
// 使用事件总线发送
SpringApplication.publishEvent(notification);
}
}
“`
## 五、配置管理实践
### 1. 配置模板管理
“`java
@Service
public class ConfigTemplateService {
/**
* 创建配置模板
*/
public ConfigTemplate createTemplate(ConfigTemplateDTO dto) {
ConfigTemplate template = new ConfigTemplate();
template.setName(dto.getName());
template.setContent(dto.getContent());
template.setFormat(dto.getFormat());
template.setEnv(dto.getEnv());
// 验证模板格式
validateTemplate(template);
return templateRepository.save(template);
}
/**
* 应用配置模板
*/
public void applyTemplate(String appId, String templateId) {
ConfigTemplate template = templateRepository.findById(templateId)
.orElseThrow(() -> new NotFoundException(“模板不存在”));
// 解析模板变量
Map
String content = replaceVariables(template.getContent(), variables);
// 创建配置
createConfigFromTemplate(appId, content);
}
private String replaceVariables(String content, Map
String result = content;
for (Map.Entry
result = result.replace(“${” + entry.getKey() + “}”,
entry.getValue().toString());
}
return result;
}
}
“`
### 2. 配置版本控制
“`java
@Service
public class ConfigVersionService {
/**
* 获取配置版本历史
*/
public List
return versionRepository.findAllByAppIdAndClusterNameAndKey(
appId, clusterName, key
).stream()
.sorted(Comparator.comparing(ConfigVersion::getCreateTime).reversed())
.collect(Collectors.toList());
}
/**
* 回滚到指定版本
*/
public ConfigVersion rollback(String appId, String clusterName, String key,
String targetVersion) {
ConfigVersion target = versionRepository.findById(targetVersion)
.orElseThrow(() -> new NotFoundException(“版本不存在”));
// 创建新版本
ConfigVersion rollbackVersion = new ConfigVersion();
rollbackVersion.setAppId(appId);
rollbackVersion.setClusterName(clusterName);
rollbackVersion.setKey(key);
rollbackVersion.setValue(target.getValue());
rollbackVersion.setOperator(“系统回滚”);
rollbackVersion.setComment(“回滚到版本:” + targetVersion);
return versionRepository.save(rollbackVersion);
}
}
“`
## 六、权限控制实现
### 1. 自定义权限校验
“`java
@Component
public class CustomPermissionChecker {
/**
* 检查配置编辑权限
*/
public boolean hasEditPermission(String appId, String userId) {
// 检查是否为应用负责人
boolean isAppOwner = isAppOwner(appId, userId);
// 检查是否有管理员权限
boolean isAdmin = isAdminRole(userId);
// 检查团队权限
boolean hasTeamPermission = checkTeamPermission(appId, userId);
return isAppOwner || isAdmin || hasTeamPermission;
}
/**
* 检查配置发布权限
*/
public boolean hasPublishPermission(String appId, String userId) {
// 获取应用信息
App app = getAppInfo(appId);
// 检查是否为发布白名单用户
boolean isWhitelist = isWhitelistUser(app, userId);
// 检查团队权限
boolean hasTeamPermission = checkTeamPermission(appId, userId);
return isWhitelist || hasTeamPermission;
}
private boolean isAppOwner(String appId, String userId) {
// 查询应用负责人
App app = appRepository.findById(appId).orElse(null);
return app != null && userId.equals(app.getOwnerUserId());
}
private boolean isWhitelistUser(App app, String userId) {
return app.getReleaseWhitelist() != null &&
app.getReleaseWhitelist().contains(userId);
}
}
“`
## 七、高可用方案
### 1. 本地缓存机制
“`java
@Service
public class LocalCacheService {
private Cache
public LocalCacheService() {
this.localCache = CacheBuilder.newBuilder()
.maximumSize(10000)
.expireAfterWrite(5, TimeUnit.MINUTES)
.build();
}
/**
* 缓存配置数据
*/
public void cacheConfig(String cacheKey, String configData) {
localCache.put(cacheKey, new CacheItem(configData, System.currentTimeMillis()));
}
/**
* 获取缓存配置
*/
public String getCachedConfig(String cacheKey) {
try {
CacheItem item = localCache.getIfPresent(cacheKey);
if (item != null && !isExpired(item)) {
return item.getData();
}
} catch (Exception e) {
log.error(“获取缓存失败”, e);
}
return null;
}
private boolean isExpired(CacheItem item) {
return System.currentTimeMillis() – item.getCreateTime() > 300000;
}
}
“`
### 2. 故障切换
“`java
@Component
public class FailoverStrategy {
@Autowired
private LocalCacheService cacheService;
/**
* 获取配置,支持故障切换
*/
public String getConfig(String appId, String clusterName, String key) {
// 优先从本地缓存获取
String cacheKey = buildCacheKey(appId, clusterName, key);
String cachedConfig = cacheService.getCachedConfig(cacheKey);
if (cachedConfig != null) {
return cachedConfig;
}
// 尝试从主服务获取
try {
String config = fetchFromMaster(appId, clusterName, key);
cacheService.cacheConfig(cacheKey, config);
return config;
} catch (Exception e) {
log.error(“主服务获取失败”, e);
// 尝试从备服务获取
try {
String config = fetchFromBackup(appId, clusterName, key);
cacheService.cacheConfig(cacheKey, config);
return config;
} catch (Exception ex) {
log.error(“备服务获取失败”, ex);
// 返回本地缓存
return cachedConfig;
}
}
}
}
“`
## 八、常见问题解决
### 1. 配置推送失败
“`java
// 问题:配置修改后无法推送到客户端
// 解决方案:
// 1. 检查 Config Service 服务状态
// 2. 检查网络连接
// 3. 查看日志确认推送流程
@PostMapping(“/push-failure-fix”)
public Result fixPushFailure(@RequestBody PushFailureRequest request) {
// 强制推送配置
configService.forcePush(request.getAppId(), request.getClusterName());
// 清理本地缓存
cacheService.clearLocalCache();
return Result.success(“配置强制推送成功”);
}
“`
### 2. 数据不一致
“`java
// 问题:客户端配置与服务器不一致
// 解决方案:
// 1. 手动触发配置拉取
// 2. 重置客户端本地缓存
// 3. 同步配置文件
@Component
public class DataSyncService {
/**
* 同步配置数据
*/
public void syncConfigData(String appId, String clusterName) {
// 获取服务器配置
List
// 更新本地缓存
for (ConfigItem config : serverConfigs) {
cacheService.cacheConfig(config.getKey(), config.getValue());
}
}
}
“`
## 总结
Apollo 配置中心的二次开发需要根据业务需求进行定制。掌握上述核心要点,结合实际情况进行扩展,可以构建出更强大的配置管理系统。
**核心要点回顾:**
– 理解 Apollo 核心架构和工作原理
– 掌握 API 接口开发和配置管理实践
– 实现权限控制和配置版本管理
– 确保高可用和故障切换机制
– 解决常见问题的经验积累
#Apollo #配置中心 #Java #微服务 #二次开发 #分布式配置


暂无评论内容